+- My Board (https://ellohost.com/forum)
+-- Forum: Tutoriel EN (https://ellohost.com/forum/forumdisplay.php?fid=8)
+--- Forum: Others (https://ellohost.com/forum/forumdisplay.php?fid=20)
+--- Thread: How to Install Jenkins on Ubuntu (/showthread.php?tid=792)
How to Install Jenkins on Ubuntu - aaron - 09-10-2023
How to Install Jenkins on Ubuntu
Installing Jenkins is as easy as using the integrated APT package manager of Ubuntu. However, keep in mind that some requirements must be met for a VPS-based system before proceeding with the installation.
Prerequisites for Jenkins Installation
- Ubuntu server with 18.04, 20.04, or 22.04 version and SSH access
- A non-root sudo user
- 256 MB of RAM and 1 GB of drive space for solo use. However, no less than 10 GB is recommended if Jenkins runs inside a Docker container
- 4+ GB of RAM and 50+ GB of drive space for group use
- Oracle JDK 8 or 11
- A web server running Apache or Nginx
1. Install Java Development Kit
Jenkins supports Java 8 and Java 11. However, in this tutorial, we will use Java Runtime Environment 11.
First, update the default Ubuntu packages lists for upgrades with the following command:
sudo apt-get updateThen, run the following command to install JDK 11:
sudo apt-get install openjdk-11-jdkTo test if Java has been installed successfully, run this command:
java -versionIt should look something like this:

2. Install Jenkins
Now, we will install Jenkins itself. Issue the following four commands in sequence to initiate the installation from the Jenkins repository:
curl -fsSL https://pkg.jenkins.io/debian-stable/jenkins.io.key | sudo tee \

  /usr/share/keyrings/jenkins-keyring.asc > /dev/null
echo deb [signed-by=/usr/share/keyrings/jenkins-keyring.asc] \
https://pkg.jenkins.io/debian-stable binary/ | sudo tee \
/etc/apt/sources.list.d/jenkins.list > /dev/nullsudo apt-get updatesudo apt-get install jenkinsOnce that’s done, start the Jenkins service with the following command:
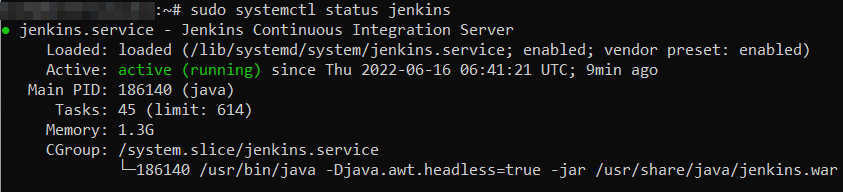
sudo systemctl start jenkins.serviceTo confirm its status, use:
sudo systemctl status jenkinsIf it’s working correctly, the terminal window will look like this:
3. Adjust Firewall and Configuring Jenkins
With Jenkins installed, we can proceed with adjusting the firewall settings. By default, Jenkins will run on port 8080.
In order to ensure that this port is accessible, we will need to configure the built-in Ubuntu firewall (ufw). To open the 8080 port and enable the firewall, use the following commands:
sudo ufw allow 8080sudo ufw enableOnce done, test whether the firewall is active using this command:
sudo ufw status