


How to Set Up OpenVPN Server Tunneling
A VPN tunnel is an encrypted connection between your device and the VPN. Follow these steps to enable it:
To enable IP forwarding in your kernel, use the command below. It will enable traffic forwarding over IPv4.
echo 'net.ipv4.ip_forward=1' | sudo tee -a /etc/sysctl.d/99-sysctl.confTo apply the changes, enter:
sudo sysctl -pOpenVPN does not support simultaneous tunnels over IPv6 and IPv4. Disable IPv6 using:
        sudo sysctl -w net.ipv6.conf.all.disable_ipv6=1


        sudo sysctl -w net.ipv6.conf.default.disable_ipv6=1
To disable IPv6 manually, set the below parameters on boot:
        net.ipv6.conf.all.disable_ipv6 = 1


        net.ipv6.conf.default.disable_ipv6 = 1


        net.ipv6.conf.lo.disable_ipv6 = 1
To do it, open the 99-sysctl.conf file located in /etc/sysctl.d/. Use the cd command to access the folder and a preferred text editor to edit the file. Save the changes.
Activate the new settings using this command:
sysctl -pOpen the /etc/hosts file and comment on the IPv6 resolution line as shown below. This will disable IPv6.
#::1 localhost ip6-localhost ip6-loopbackLog in to the Admin server URL and open VPN Settings.
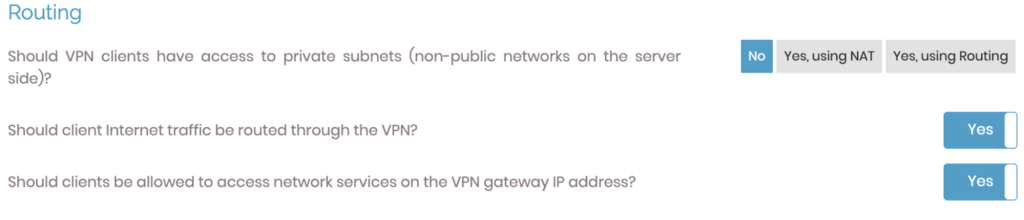
In the Routing section, set the Should VPN clients have access to private subnets (non-public networks on the server side)? option to No. Then, set the Should client Internet traffic be routed through the VPN? option to Yes.
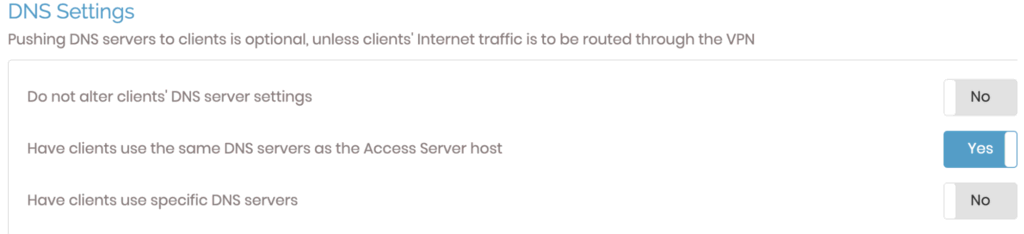
To avoid any DNS leak, alter the DNS resolver settings. Enable the Have clients use the same DNS servers option.
Save the new settings and click Update Running Server.
Restart the OpenVPN server from the Status tab. Click Stop and then Start.
Join ellohost