How to Create a WordPress Plugin
Step 1 – Storing the Plugin
The first step to creating a new plugin is to make a folder for its files. The folder’s name should be unique and descriptive. Check the other plugin folders’ names within /wp-content/plugins/ to make sure that the new name isn’t in use already.
Use an FTP client to connect to your hosting account to facilitate the file upload process. Navigate to wp-content -> plugins from the main WordPress directory. Then, create a new folder named my-first-plugin in the plugins folder.

Step 2 – Creating the First File
The main plugin file will contain the information WordPress requires to display your plugin in the plugin list where you’ll be able to activate it.
Create a new PHP file called my-first-plugin.php in the folder you made earlier. This main plugin file will contain header comments with additional information for WordPress to read or display.
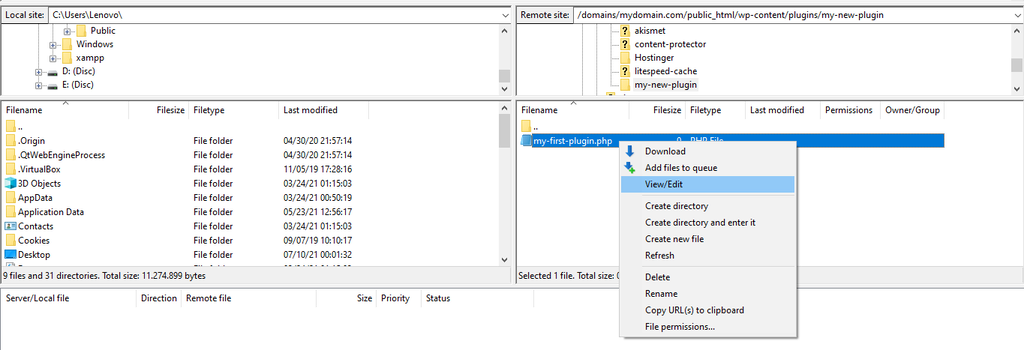
Then, right-click the file and select View/Edit to add the following code using an HTML editor:
<?php

/*

Plugin Name: My First Plugin

Description: This is my first plugin! It makes a new admin menu link!

Author: Your Name

*/

?>
Step 3 – Writing the Plugin Functions
Before we begin writing the functions for the plugin, it is highly recommended to give all files, functions, and variables a unique prefix in their name to avoid any conflicts with other plugins. In our example, we’ll be using the prefix mfp, which is short for My First Plugin.
Create a new folder named Includes in the plugin’s main directory. We’ll use it to store supporting files used by the main file. In this folder, create a PHP file and name it mfp-functions.php. Give it the opening <?php tag on the first line.
This new file will contain all of your plugin’s functions.
We’ll have to include mfp-functions.php in the main plugin file to allow the other plugin files to use the functions it defines. Use require_once to ensure the plugin only works if the functions file is present.
Edit my-first-plugin.php as shown below. Then, save it and upload the file once again, overwriting the previous version when asked.
<?php

/*

Plugin Name: My First Plugin

Description: This is my first plugin! It makes a new admin menu link!

Author: Your Name

*/

// Include mfp-functions.php, use require_once to stop the script if mfp-functions.php is not found

require_once plugin_dir_path(__FILE__) . 'includes/mfp-functions.php';

?>
Step 4 – Creating the Plugin Admin Page
After defining the plugin’s functions, it’s time to build the page that the menu button will take us to. Create a new PHP file named mfp-first-acp-page.php in the Includes subfolder and add the following code to it:
<div class="wrap">

  <h1>Hello! </h1>

  <p> This is my plugin's first page </p>

</div>
When creating admin pages, WordPress recommends enclosing your own HTML with a <div> tag and giving it a “wrap” class to ensure that all your content appears in the correct place. Doing so also helps reduce clutter in the code.
Finally, navigate to the Plugins section on your WordPress dashboard and activate the new plugin. If the process is successful, the admin panel link of your very first plugin will appear at the bottom of the navigation menu.

Congratulations – you have successfully created your first WordPress plugin.
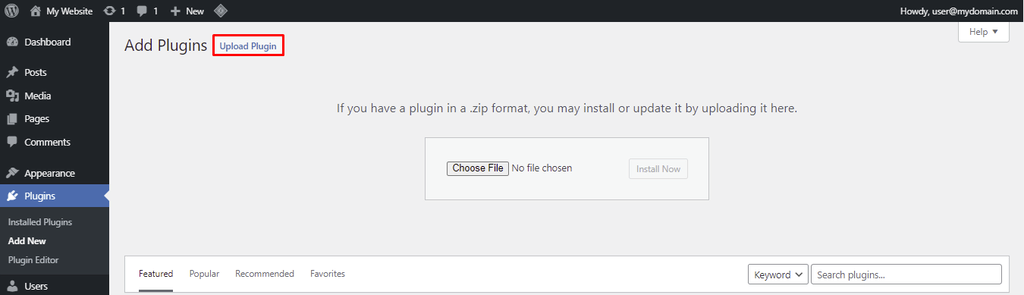
If you built the plugin on a staging site, you’ll need to install the plugin on the live site. The following steps will show you how to do it:
- In FileZilla, right-click the my-new-plugin folder and select Download. Then, compress the files into a ZIP archive.
- Navigate to the Plugins menu from your WordPress dashboard. Then, click Add New.
- Click Upload Plugin and select the ZIP file of your plugin.
- Select Install Now to start the installation process.